This note will discuss the basic procedure to fetch the first frame from the epix10ka camera and list the tasks I need to complete for the mossbauer experiment. It will be saved at mossbauer subgroup elog and also send a copy to the EPIX10k collaboration.
Overview
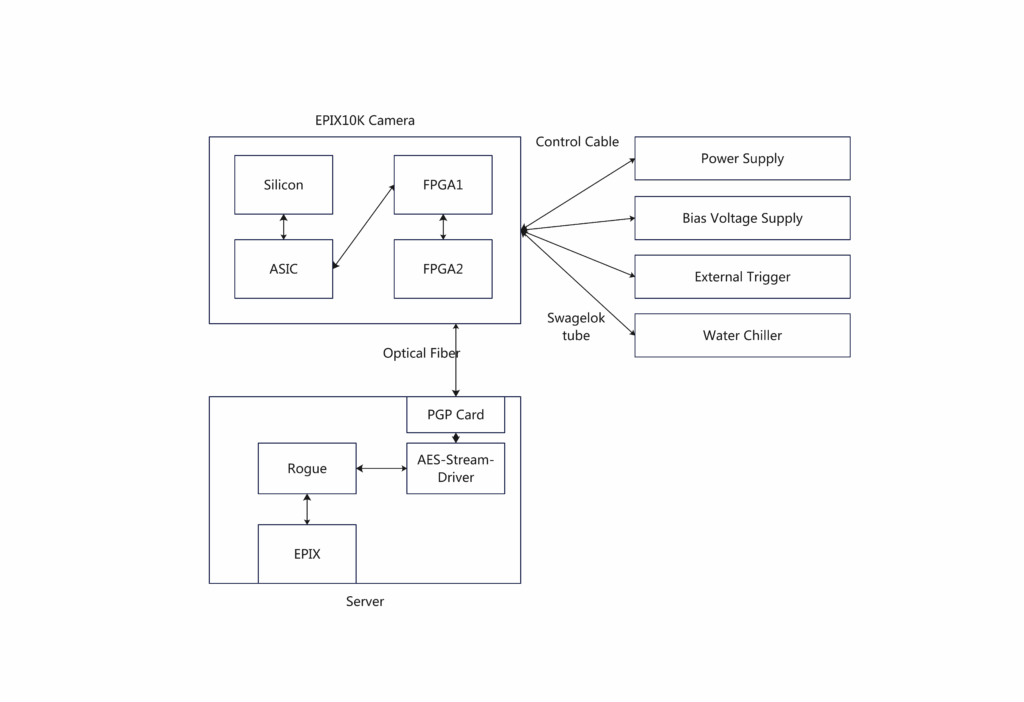
The whole camera system includes five parts:
– Hardware(Camera): Silicon Detector, ASIC and two FPGA boards;
– Hardware(Supporting System): Power Supply, Voltage Supply, Trigger System, Water Chiller;
– Firmware: Camera Firmware(FPGA1, FPGA2);
– Firmware: Readout PGP Card ;
– Software: Rogue(DAQ) and Online Analysis Software ;
Materials You need;
Hardware
- EPIX10ka Camera;
- Control Cable/ Power Supply Cable;
- DC Power Supply; (Rohde&Schwarz HMP4040 power supply; https://www.rohde-schwarz.com/us/products/test-and-measurement/dc-power-supplies/rs-hmp4000-power-supply-series_63493-47360.html)
- DC Power Supply for bias voltage; (Keithley 2400; https://www.tek.com/en/products/keithley/source-measure-units/2400-standard-series-sourcemeter)
- PGP Readout Card (Xilinx Varium C1100; https://www.mouser.com/ProductDetail/AMD-Xilinx/V-C1100-P00G-PQ-G )
- Optical Fiber and Breakout System
QSFP module *1 : https://www.fs.com/products/36157.html ,
SFP module*4 : https://www.fs.com/products/74668.html ;
Breakout cable: 1*Female UPC and 4*LC duplex; https://www.fs.com/products/31098.html ; - Water Chiller(https://www.thermotekusa.com/product/t257p-20) and the swagelok connector;
- Function Generator(3.3V TTL);
- Linux Server with PCIE slot and 8-pin PCIE power supply cable.
- USB-MicroUSB cable (used as JTAG);
Firmware
- EPIX10ka Camera Stage 1 Board Firmware ; (maybe already flashed)
- EPIX10ka Camera Stage 2 Board Firmware ; (maybe already flashed)
- PGP Readout Firmware;
Software
- Anaconda;
- Vivado;
- Aes-stream-Driver(https://github.com/slaclab/aes-stream-drivers);
- PGP-PCIE-Apps(https://github.com/slaclab/pgp-pcie-apps)
- Rogue Newest and V5.14.0 (https://github.com/slaclab/rogue)
- Epix (https://github.com/slaclab/epix)
Basic Procedure;
Hardware Preparation
- Test the camera on an existing system to make sure that the camera and control cable could work;
- Purchase the Supporting system and test them independently;
- PGP Card: make sure that you could see it via lspci;
lspci -vd 10ee:
04:00.0 Processing accelerators: Xilinx Corporation Device 5058
    Subsystem: Xilinx Corporation Device 000e
    Flags: fast devsel, IOMMU group 13
    Memory at fc00000000 (64-bit, prefetchable) [disabled] [size=2G]
    Memory at fc80000000 (64-bit, prefetchable) [disabled] [size=128K]
    Capabilities: [40] Power Management version 3
    Capabilities: [60] MSI-X: Enable- Count=32 Masked-
    Capabilities: [70] Express Endpoint, MSI 00
    Capabilities: [100] Advanced Error Reporting
    Capabilities: [1c0] Secondary PCI Express
    Capabilities: [e00] Access Control Services
    Capabilities: [e10] Physical Resizable BAR
    Capabilities: [e80] Vendor Specific Information: ID=0020 Rev=0 Len=010
Flash PGP Firmware for the first time;
PDF Manual by Larry Ruckman: https://docs.google.com/presentation/d/1PD_glIPddIrT90wjfL1s6tGJ4o9_zNXtNg1rMm2bkf4
Firmware also from Larry Ruckman: https://github.com/slaclab/pgp-pcie-apps/releases/download/v2.6.0/XilinxVariumC1100Pgp2b-0x02060000-20241030203856-ruckman-4a735d2.mcs (Make sure that it is pgp2b for small EPIX camera)
- Make sure the PGP card is inserted properly with 8-pin power cable connected , and it could be seen via the lspci;
- Install Newest Vivado https://www.xilinx.com/support/download.html. Vivado is IDE(integrated development environment) of FPGA firmwares and it is free to download.
- Install JTAG Cable Driver https://docs.amd.com/r/en-US/ug973-vivado-release-notes-install-license/Install-Cable-Drivers
- Reboot the server and connect the USB JTAG of the PGP card to the server;
- Start Vivado and select “Open Hardware Manager” (There are several options of running vivado, hardware manager is one of them)
- Click on “Tools” – “Auto Connect” , this will automatically find the Varium C1100;
- Click on “Tools” – “Add configuration Memory Device” – “xcu50_u55n_0” ; Search for “mt25qu01g-spi-x1_x2_x4”;
- Then you shall be able to see “mt25qu01g-spi-x1_x2_x4” on hardware manager, right click it and select “Program Configuration Memory Device”
- Select the .mcs file and start programming PROM.
- Return to the hardware manager main page, right click “xcu50_u55n_0” and select “Boot from COnfiguration memory Device”
- Reboot the server
lspci -vd 1a4a:
01:00.0 Signal processing controller: SLAC National Accelerator Lab TID-AIR AXI Stream DAQ PCIe card
        Subsystem: SLAC National Accelerator Lab TID-AIR AXI Stream DAQ PCIe card
        Flags: bus master, fast devsel, latency 0, IRQ 162, IOMMU group 12
        Memory at f3000000 (32-bit, non-prefetchable) [size=16M]
        Capabilities: [40] Power Management version 3
        Capabilities: [70] Express Endpoint, MSI 00
        Capabilities: [100] Advanced Error Reporting
        Capabilities: [1c0] Secondary PCI Express
        Capabilities: [1f0] Virtual Channel

# Later, if you loaded the driver, an additional line will be present;
Kernel driver in use: datadev
Later on, we could flash the firmware via the “https://github.com/slaclab/pgp-pcie-apps/blob/main/software/scripts/updatePcieFpga.py“
Software Environment
1.Git clone the repositories, make sure that you use “git clone –recursive”
git clone --recursive git@github.com:slaclab/aes-stream-drivers.git
git clone --recursive git@github.com:slaclab/pgp-pcie-apps.git
git clone --recursive git@github.com:slaclab/rogue.git
git clone --recursive git@github.com:slaclab/epix.git
2. Install aes-stream-driver (follow the instruction of https://github.com/slaclab/pgp-pcie-apps , but take caution that the name if driver is datadev_0 , not data_dev0)
This need to be done each time the server is rebooted;
# Go to the driver directory
$ cd aes-stream-drivers/data_dev/driver/

# Build the driver
$ make

# Load the driver
$ sudo /sbin/insmod ./datadev.ko cfgSize=0x50000 cfgRxCount=256 cfgTxCount=16

# Give appropriate group/permissions
$ sudo chmod 666 /dev/datadev_*

# Check for the loaded device
$ cat /proc/datadev_0
The output of the cat shall look like below;
---------- Firmware Axi Version -----------
     Firmware Version : 0x2060000
           ScratchPad : 0x0
        Up Time Count : 520594
             Git Hash : 4a735d22e7baa9c6fa7e6feb0bddf33fa57520bf
            DNA Value : 0x0000000040020000015060482c8061c5
         Build String : XilinxVariumC1100Pgp2b: Vivado v2023.1, rdsrv418 (Ubuntu 22.04.5 LTS), Built Wed Oct 30 08:38:56 PM PDT 2024 by ruckman

---------- DMA Firmware General ----------
          Int Req Count : 0
         Continue Count : 0
          Address Count : 4096
    Hw Write Buff Count : 256
     Hw Read Buff Count : 0
           Cache Config : 0x0
            Desc 128 En : 1
            Enable Ver  : 0x4010101
      Driver Load Count : 1
               IRQ Hold : 10000
              BG Enable : 0x0
           GPU Async En : 0
            DMA Timeout : 0

-------- DMA Kernel Driver General --------
 DMA Driver's Git Version : 6.6.2
 DMA Driver's API Version : 0x6
         GPUAsync Support : Disabled

---- Read Buffers (Firmware->Software) ----
         Buffer Count : 256
          Buffer Size : 327680
          Buffer Mode : 1
      Buffers In User : 0
        Buffers In Hw : 256
  Buffers In Pre-Hw Q : 0
  Buffers In Rx Queue : 0

---- Write Buffers (Software->Firmware) ---
         Buffer Count : 16
          Buffer Size : 327680
          Buffer Mode : 1
      Buffers In User : 0
        Buffers In Hw : 0
  Buffers In Pre-Hw Q : 0
  Buffers In Sw Queue : 16
3. Install Newest Rogue ;
Follow the instructions here https://slaclab.github.io/rogue/installing/miniforge.html to install the newest rogue, the newest rogue makes it possible to use the newest PGP-PCIE-APPS. At least to me, the anaconda also works.
$ conda activate
$ conda config --set channel_priority strict
$ conda install -n base conda-libmamba-solver
$ conda config --set solver libmamba
$ conda create -n rogue_tag -c tidair-tag -c conda-forge rogue
$ conda install -c tidair-tag -c conda-forge rogue

# Also;
$ conda config --add channels defaults
4. Install PGP-PCIE-Apps
$ git clone --recursive git@github.com:slaclab/pgp-pcie-apps.git5. Install Rogue 5.14.0;
The original EPIX repository needs the Rogue V5 because V6 and V5 has different hardware class structure, so the EPIX scripts could not run properly under newest Rogue. (https://slaclab.github.io/rogue/hardware/pgp/classes/pgpCard.html)
# Install the basic packages
$ sudo apt install cmake
$ sudo apt install python3
$ sudo apt install libboost-all-dev
$ sudo apt install libbz2-dev
$ sudo apt install python3-pip
$ sudo apt install git
$ sudo apt install libzmq3-dev
$ sudo apt install python3-pyqt5
$ sudo apt install python3-pyqt5.qtsvg
The V5.14 needs the EPICS V3 to show graphical interface, and in the newer EPICS, the pca module is not included. As a result, the EPICS V3 should be installed manually.
# The V5.14 needs the EPICS V3
sudo apt install build-essential
sudo apt install libreadline-dev

mkdir $HOME/EPICS
cd $HOME/EPICS
wget https://epics-controls.org/download/base/base-3.15.9.tar.gz
tar -xvf base-3.15.9.tar.gz
cd base-3.15.9
make

export EPICS_BASE=${HOME}/EPICS/epics-base
export EPICS_HOST_ARCH=$(${EPICS_BASE}/startup/EpicsHostArch)
export PATH=${EPICS_BASE}/bin/${EPICS_HOST_ARCH}:${PATH}
Then we could create the V5.14 Conda environment.
# Create a new conda environment called "test"
$ wget https://codeload.github.com/slaclab/rogue/tar.gz/refs/tags/v5.14.0
$ tar -xvzf rogue-5.14.0.tar.gz
$ conda env create -n test -f conda.yml
# This conda.yml will install the basic packages


# The rogue should also be installed.
$ conda activate test
$ mkdir build
$ cmake .. -DROGUE_VERSION="v5.14.0"
$ make
$ make install
Check the connection of PGP card;
$ conda activate rogue_tag
$ cd ~/pgp-pcie-apps/software/scripts
$ python3 PgpMonitor.py --version 2
# Check that the PCIServer- Lane[0] - enable is True;

# Suppose that the newest rogue conda is "rogue_tag" , and V5.14.0 is "test"
Start Running EPIX10kDAQ.py
Turn on the power supply (Analog/Digital 6V, Bias 200V) and the water chiller.
$ cd ~/epix/software/Epix/scripts
$ conda activate test
$ python3 epix10kDAQ.py --pgp /dev/datadev_0- Interface:ePixBoard .
Load Settings. ~/epix/software/Epix/yml/epix10ka_u_all_LCLS_settings_120Hz_injPulser.yml
Load it twice; - Create a Data file to write into , and open it.
- Start Run;
Things to do
Short-Term
- Trigger the camera with external trigger;
- Calibrate the camera dark noise(with water chiller);
- Calibrate the camera with radioactive source(at stanford);
Middle-Term
- Software: Automatic data acquisition script based on Rogue;
- Data Analysis: Basic Data analysis script on GPU;
Long-Term
- Put the camera into use and future development;
- Firmware: Make use of Multi-purpose cable to record the direction of piezo.
Acknowledgement
The manual is the summary of the help I get from Gabriel Blaj, Larry Ruckman, Julian Mendez, Ryan Herbst, Dionisio Doering, Chris Kenney and Evan Angelico.